Aviata Cloud Solo Flight Challenge
Chapter 5: Centralizing Cross Cloud Security Events
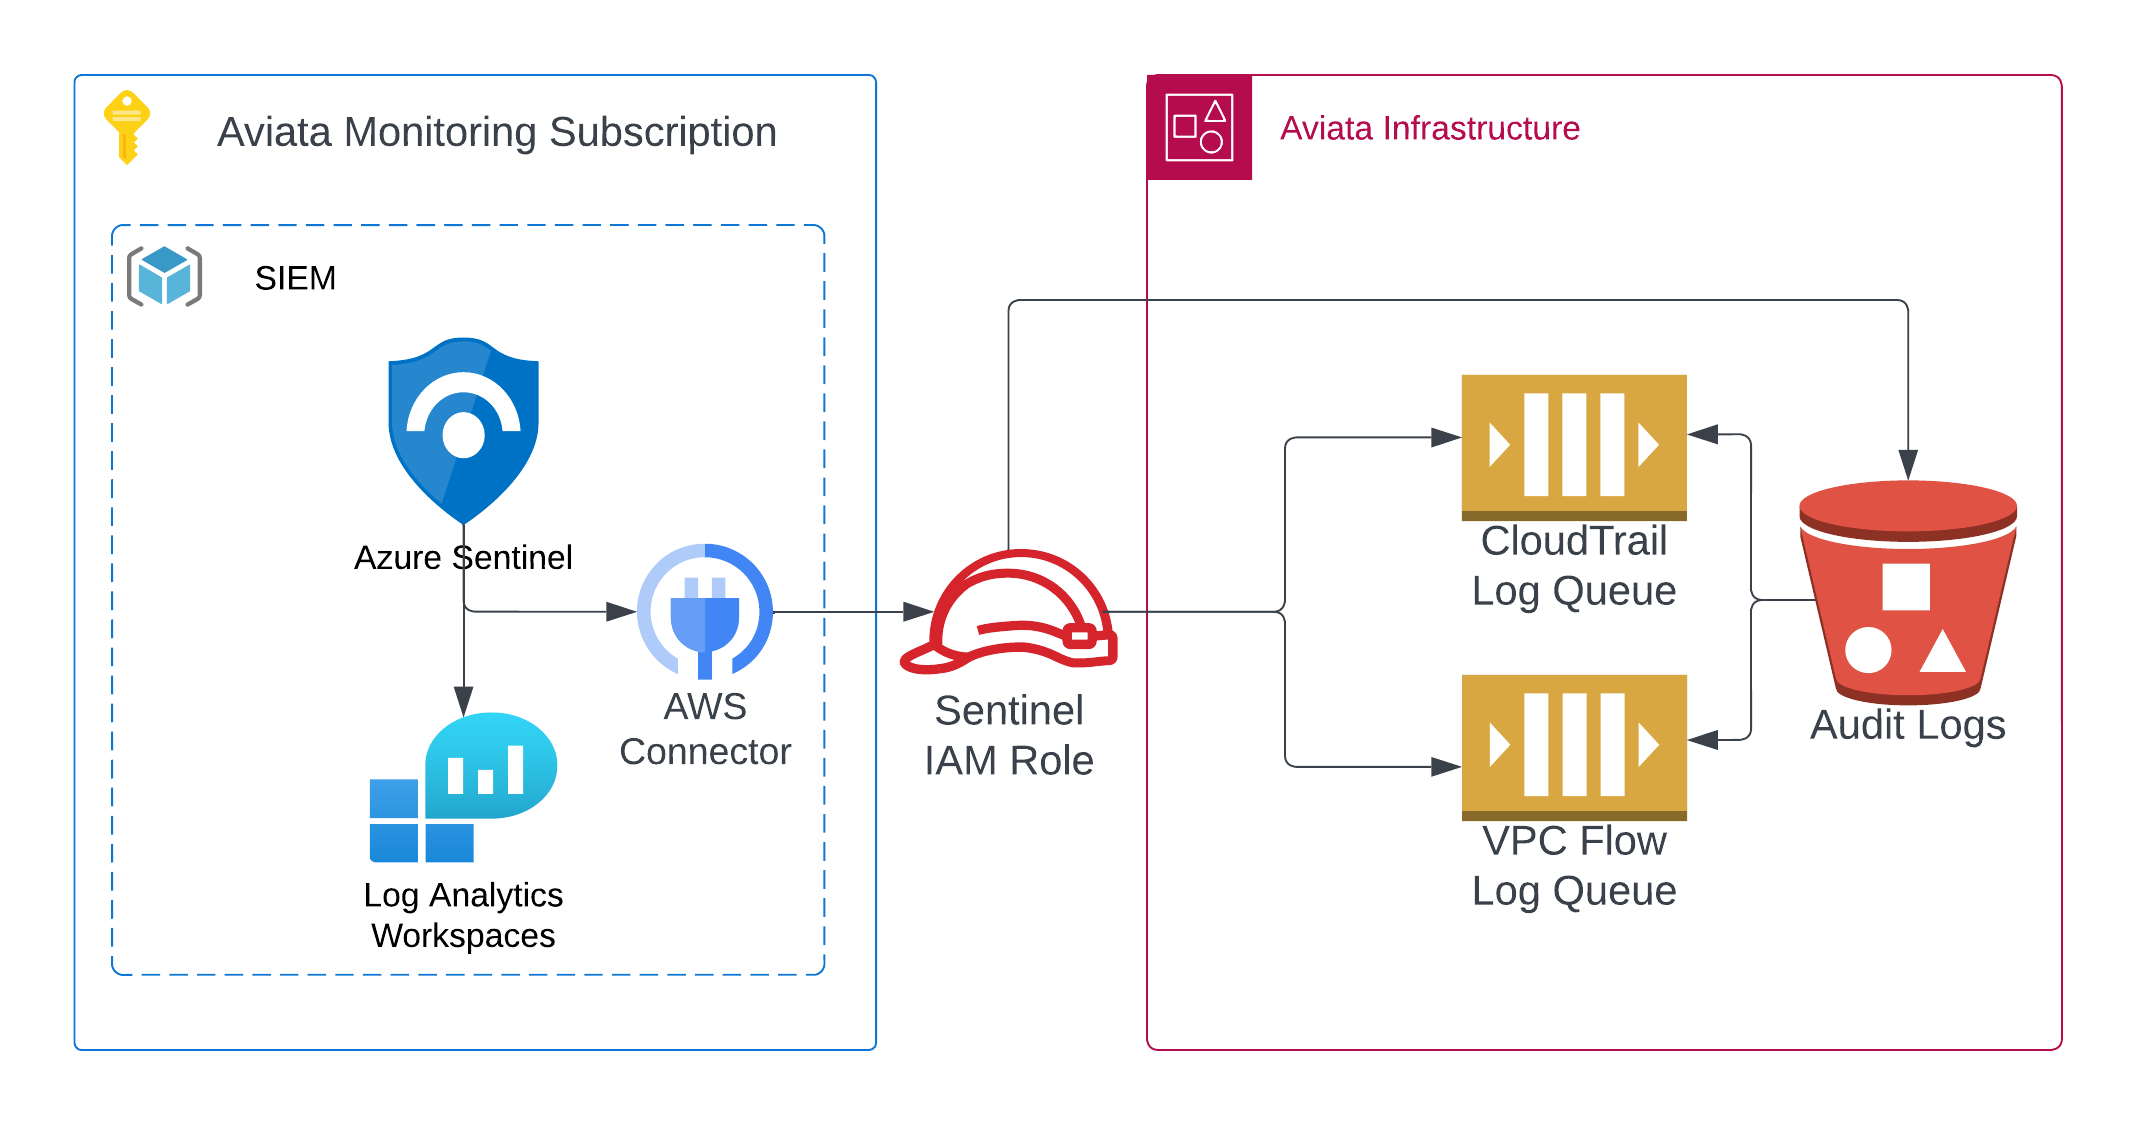
Welcome to Chapter 5 of the Aviata Cloud Solo Flight Challenge. In this chapter, you will learn how to centralize security events from multiple cloud providers into a single security information and event management (SIEM) solution. We will be using Microsoft Sentinel to collect security events from an AWS environment and analyze the data to identify potential security threats.
Build Your Environment
To complete the workshop, you need to build the Aviata cloud environment that includes a number of AWS resources used in the workshop. This process can take 30-60 minutes to complete. We strongly recommend you start this process before the workshop begins.
If you have not done so already, follow the Getting Started instructions to build your environment.
Create A Microsoft Sentinel Workspace
While you are waiting for the Aviata cloud environment to be built, you can create a Microsoft Sentinel workspace in your Azure subscription. This workspace will be used to collect security events from the Aviata cloud environment.
-
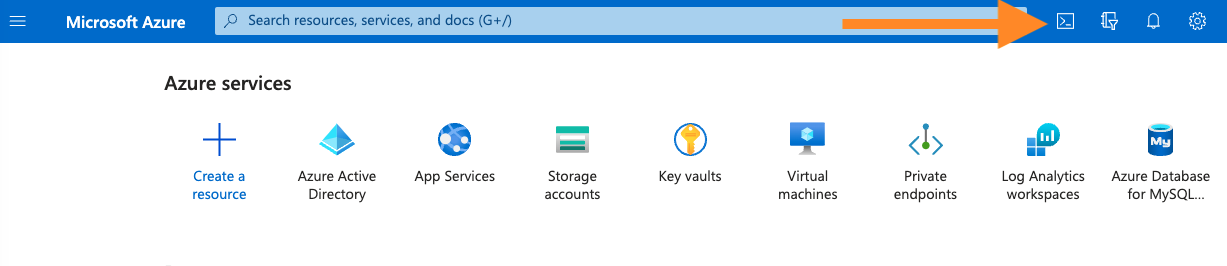
Open a new browser tab and sign into the Azure Portal. Press the Cloud Shell icon next to the search box.
-
Run the following command to create a resource group called
sans-aviata-sentinel-rgin theeastusregion. Note: You may pick any location that supports MS Sentinel, just make sure to use the same location for all resources.No Storage Required
If prompted, select the "No Storage Account Required" option for opening this Cloud Shell.
az group create --name sans-aviata-sentinel-rg --location eastusExpected Output
{ "id": "/subscriptions/{id}/resourceGroups/sans-aviata-chapter5-rg", "location": "eastus", "managedBy": null, "name": "sans-aviata-chapter5-rg", "properties": { "provisioningState": "Succeeded" }, "tags": null, "type": "Microsoft.Resources/resourceGroups" } -
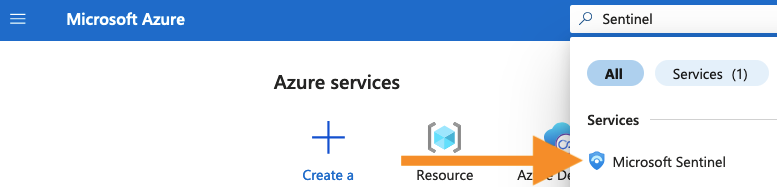
In the Azure Portal, search for the Microsoft Sentinel service and click on it.
-
Press the Create Microsoft Sentinel button to add Sentinal to a workspace.
-
Press the Create a new workspace button to create a new log analytics workspace.
-
On the Add Microsoft Sentinel to a workspace page:
-
Select your subscription and the
sans-aviata-sentinel-rgresource group. -
Enter a name for the workspace, such as
aviata-sentinel. -
Select the eastus region (or the region you used for the resource group above).
-
Press the Review + Create button to validate the configuration

-
-
Press the Create button to create the log analytics workspace.
-
Once the workspace is created, you should see the
aviata-sentinelworkspace on the Add Microsoft Sentinel to a workspace screen. Press the Add button to add Sentinel to the workspace. It will take a moment to complete before you are redirected to the Microsoft Sentinel workspace. -
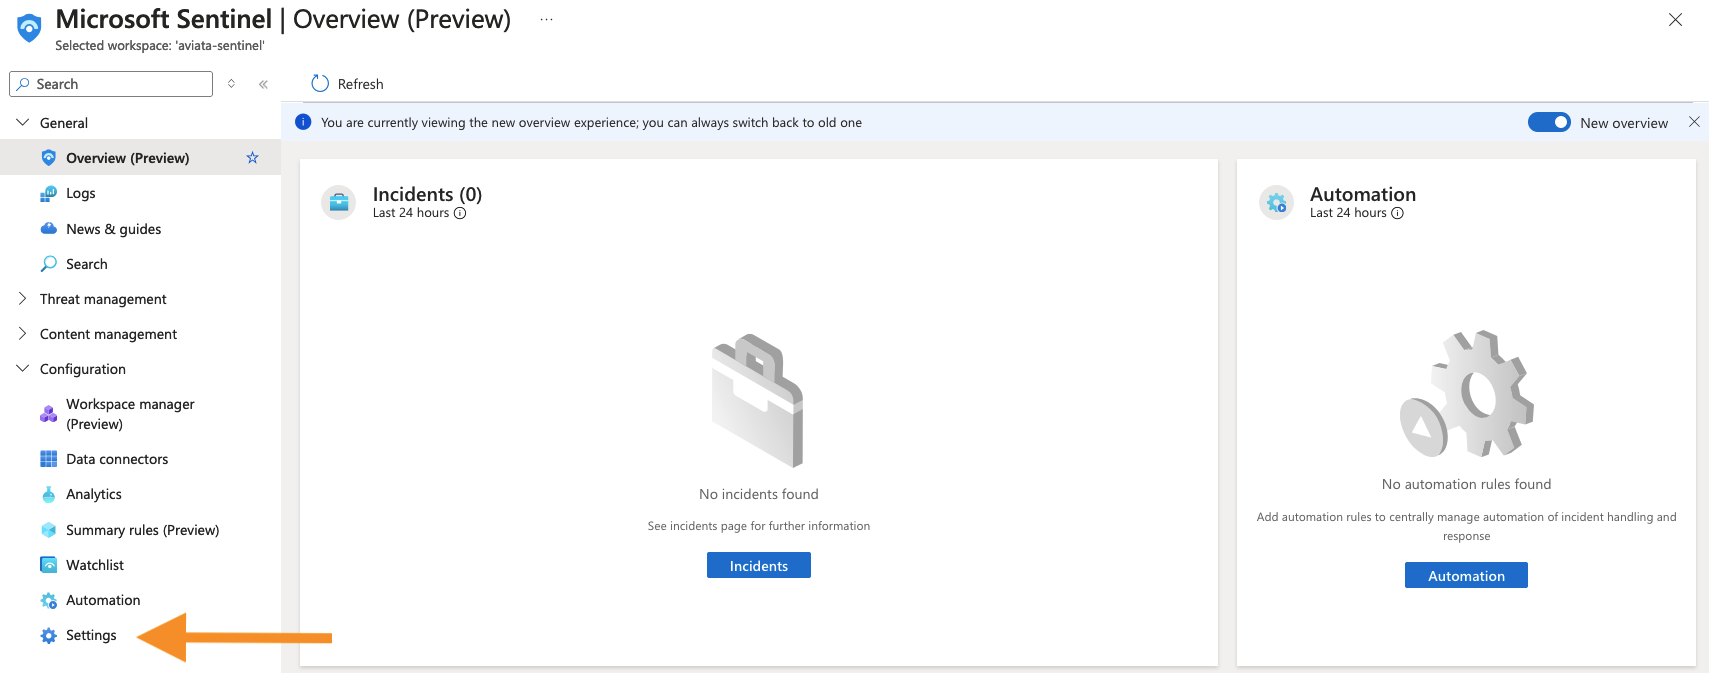
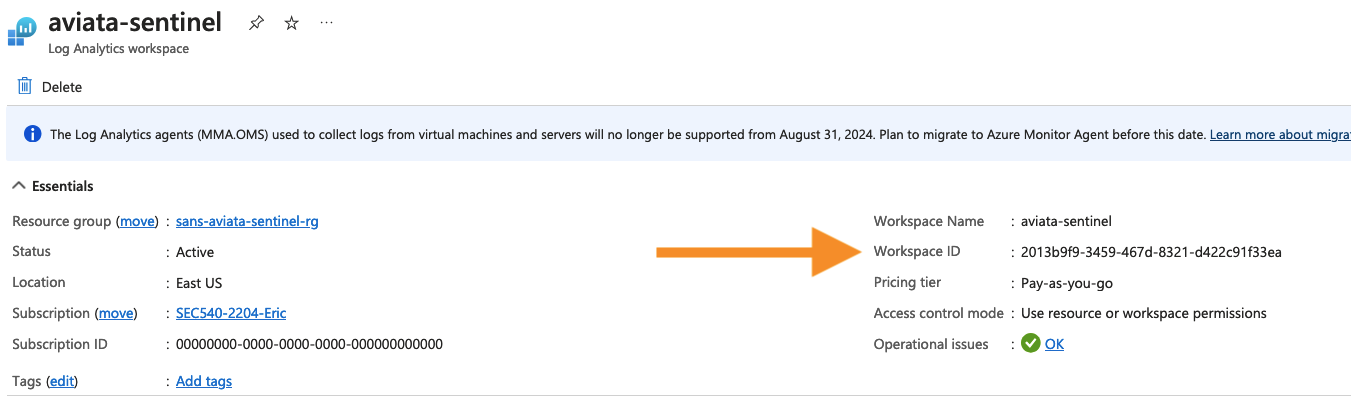
To integrate the Microsoft Sentinel workspace with the Aviata cloud environment running in AWS, you will need to grant the workspace permissions to read objects from an S3 bucket and an SQS queue. To establish trust, you need to find the unique identifier for the Sentinel workspace. Select the Configuration > Settings link in the left navigation pane.
-
Then, press the Workspace settings tab and copy the Workspace ID value.
-
Copy this value onto your clipboard. You will need this value in the next section to grant the Sentinel workspace permissions to read objects from the S3 bucket and SQS queue.
AWS Sentinel Configuration
Aviata Deployment
Before you can move forward, you must have completed the Aviata Cloud Infrastructure deployment in the Getting Started instructions. Ensure the Terraform deployment shows an Apply complete! message.
Apply complete! Resources: 87 added, 0 changed, 0 destroyed.
If any failures occur, please review the Terraform output for errors. Most errors can be resolved by running the terraform apply -auto-approve command a second time. If you need assistance, please ask the workshop facilitator for help.
Deploy AWS Sentinel Resources
Microsoft Sentinel's S3 Connector needs permissions to assume an AWS role to read log data from the S3 bucket and messages from the SQS queue. In this section, we will use Terraform to create the necessary OpenID Connect (OIDC) identity provider, IAM role, IAM policies, SQS queues, and S3 event notification resources.
-
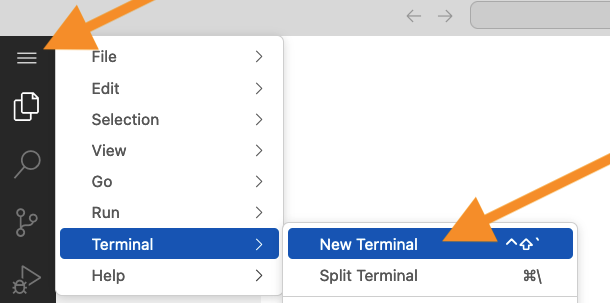
Inside the OpenVSCode server, go back to the embedded Terminal. You can use the hamburger button (≡) in the top left corner to find the New Terminal menu item.
-
Run the following command to set a new Terraform variable with the unique identifier for your MS Sentinel workspace.
export TF_VAR_sentinel_workspace_uuid="PASTE YOUR SENTINEL WORKSPACE ID HERE" -
Run the following commands to apply the MS Sentinel configuration changes to your AWS environment. Wait a few minutes for Terraform complete. When you see the Apply complete! message, move forward and inspect the resources that were created.
cd ~/code/ace135/src/infrastructure/
export TF_VAR_region="us-east-2"
terraform apply -auto-approve
Expected Output
Apply complete! Resources: 14 added, 1 changed, 6 destroyed.

Outputs:

ms_sentinel_cloudtrail_sqs_queue_url = "https://sqs.us-east-2.amazonaws.com/012345678912/ms-sentinel-cloudtrail"
ms_sentinel_role_arn = "arn:aws:iam::012345678912:role/OIDC_MicrosoftSentinelRole"
ms_sentinel_vpcflowlogs_sqs_queue_url = "https://sqs.us-east-2.amazonaws.com/012345678912/ms-sentinel-vpcflowlogs"
Sentinel AWS Identity Provider
Inspect the AWS Identity Provider and confirm the OpenID Connect token's subject, issuer, and audience claims match Sentinel's Entra ID tenant and audience values found in the Sentinel AWS Connector instructions.
-
Sign into the AWS Web Console again.
-
Set the region (top right-hand corner) to
us-east-2 (Ohio). -
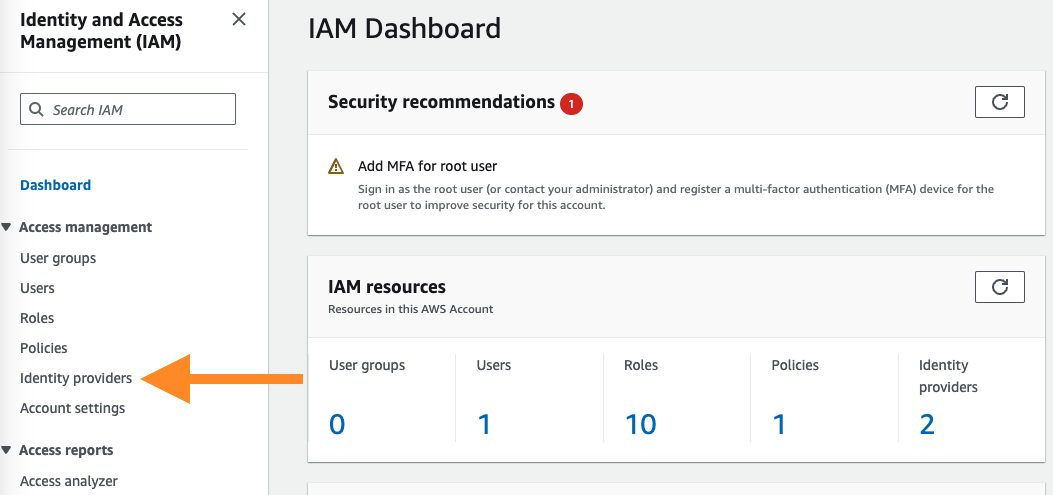
Navigate to the AWS IAM service.
-
Select the Identity providers menu item from the left-hand menu.
-
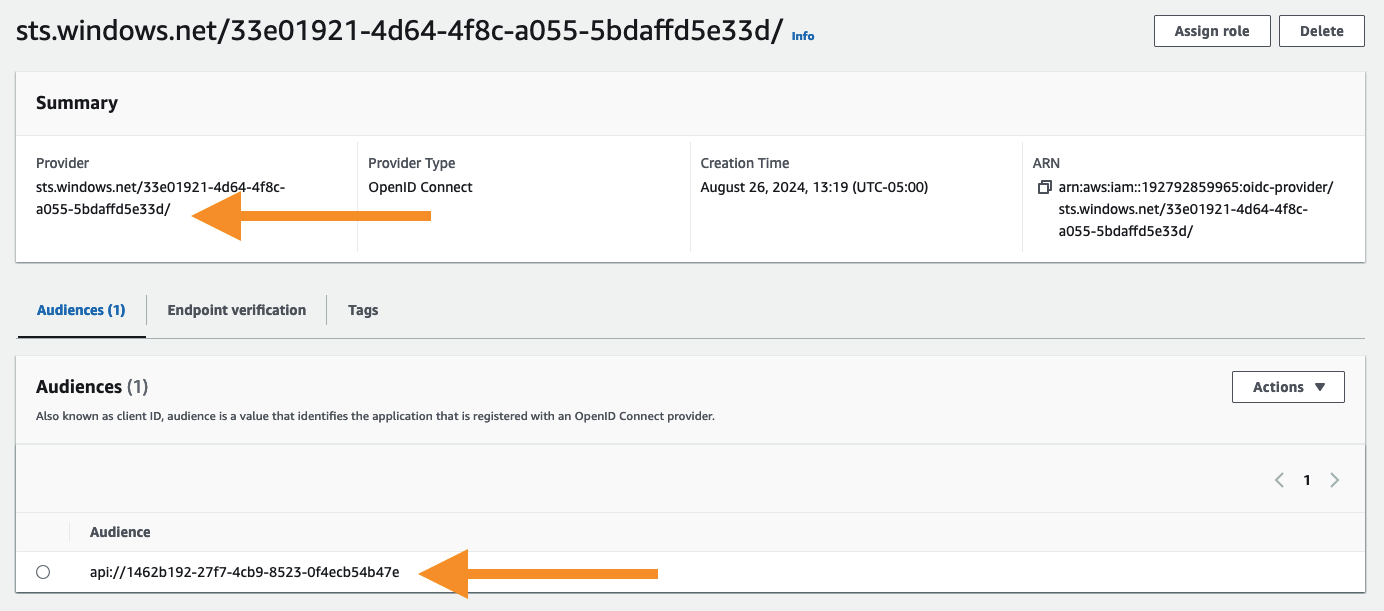
Select the Microsoft Sentinel Entra ID tenant sts.windows.net/33e01921-4d64-4f8c-a055-5bdaffd5e33d/ identity provider to view the details.
-
Observe the configuration matches the Sentinel AWS Connector instructions.
-
The Provider matches the Sentinel commercial Entra ID issuer:
sts.windows.net/33e01921-4d64-4f8c-a055-5bdaffd5e33d/. -
The Audience matches the Sentinel commercial audience:
api://1462b192-27f7-4cb9-8523-0f4ecb54b47e.
-
Sentinel AWS IAM Role
The AWS identity provider resource does not inherently grant IAM permissions. Permissions are granted by assuming an IAM Role, which returns temporary access keys for your AWS account to the Microsoft Sentinel service. Inspect the Sentinel AWS IAM Role and confirm the role's trust policy matches the Sentinel AWS Connector instructions.
-
From the AWS IAM service, select the Roles menu item from the left-hand menu. Search for the
OIDC_MicrosoftSentinelRolerole and open the details.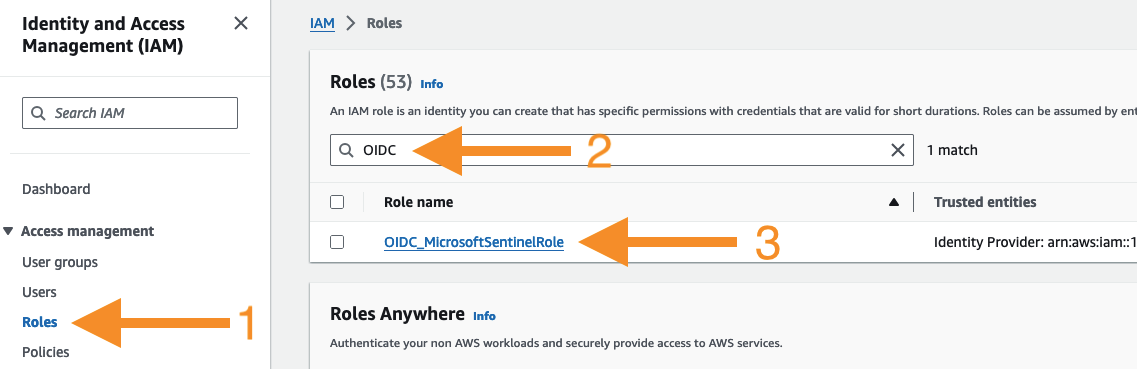
-
On the
OIDC_MicrosoftSentinelRolerole's details page, select the Trust relationships tab.
-
Inspect the
OIDC_MicrosoftSentinelRolerole's trust policy granting the assume role permission to the Microsoft Sentinel service.-
The Principal grants all JSON Web Tokens signed by the Microsoft Sentinel identity provider permission to invoke the
AssumeRoleWithWebIdentityaction on the role. -
The Condition validates the JWT's audience claim is equal to the expected Sentinel audience
api://1462b192-27f7-4cb9-8523-0f4ecb54b47eand the role session passed to theAssumeRoleWithWebIdentityAPI call is from your Sentinel workspace.
IAM Role Trust Policy
{ "Version": "2012-10-17", "Statement": [ { "Sid": "AllowSentinelAssumeRole", "Effect": "Allow", "Principal": { "Federated": "arn:aws:iam::123456789012:oidc-provider/sts.windows.net/33e01921-4d64-4f8c-a055-5bdaffd5e33d/" }, "Action": "sts:AssumeRoleWithWebIdentity", "Condition": { "StringEquals": { "sts.windows.net/33e01921-4d64-4f8c-a055-5bdaffd5e33d/:aud": "api://1462b192-27f7-4cb9-8523-0f4ecb54b47e", "sts:RoleSessionName": "MicrosoftSentinel_YOUR_SENTINEL_WORKSPACE_ID" } } } ] } -
-
Expand the
OIDC_MicrosoftSentinelRoleIAM role's permissions policies by selecting the Permissions tab and expanding thems-sentinel-logs-readpolicy.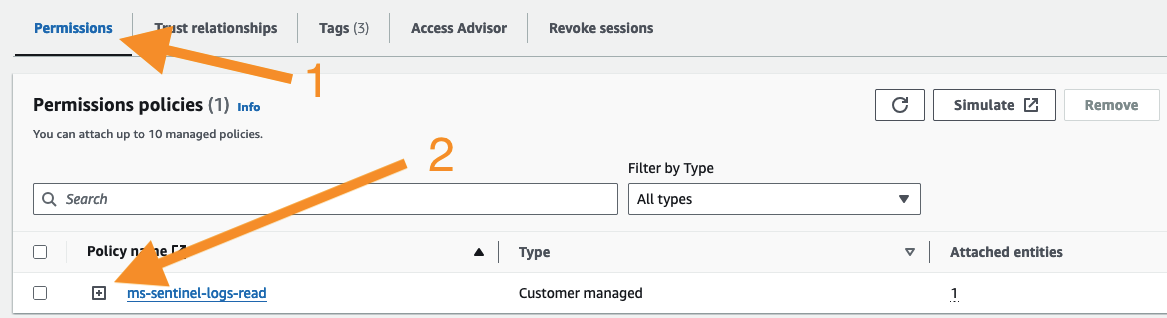
-
Inspect the
ms-sentinel-logs-readpolicy statement. Observe the policy is granting the Sentinel role permissions to read S3 objects from theaviata-audit-logs-{randomid}S3 bucket.IAM Role Trust Policy
{
  "Statement": [
    {
      "Action": [
        "s3:ListBucketMultipartUploads",
        "s3:ListBucket",
        "s3:GetObject",
        "s3:GetBucketLocation",
        "s3:GetBucketAcl"
      ],
      "Effect": "Allow",
      "Resource": [
        "arn:aws:s3:::aviata-audit-logs-{randomid}*",
        "arn:aws:s3:::aviata-audit-logs-{randomid}"
      ],
      "Sid": "AllowSentinelS3ReadAccess"
    }
  ],
  "Version": "2012-10-17"
}
Sentinel AWS S3 Event Notifications
With an understanding of how the Microsoft Sentinel service is authenticating to your AWS account and the permissions granted to read data from the aviata-audit-logs bucket, let's shift our focus to the event driven architecture notifying the Sentinel service of new log objects.
-
From the AWS S3 service, select the
aviata-audit-logs-{randomid}bucket.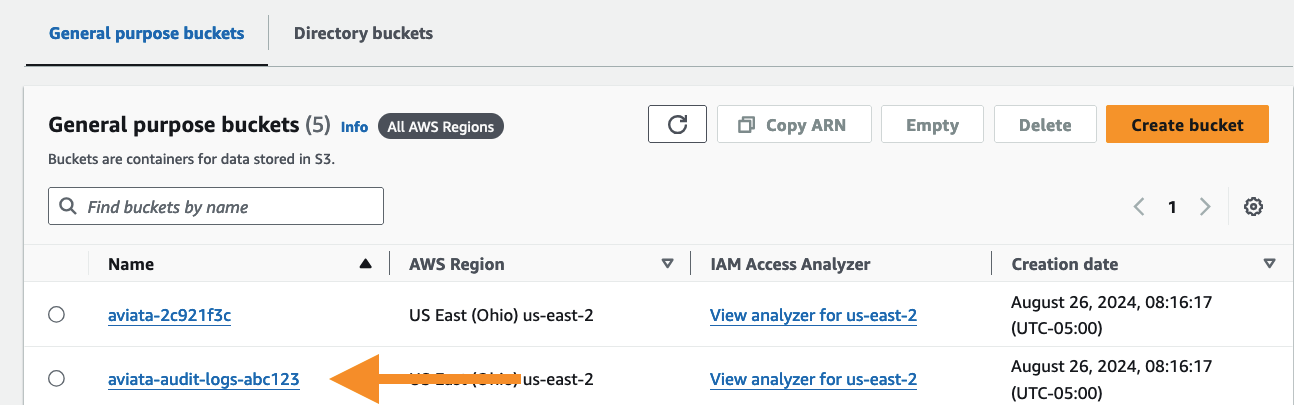
-
Select the Properties tab and scroll down to the Event notifications section. You will see that the bucket is configured to send a notification to the
ms-sentinel-cloudtrailandms-sentinel-vpcflowlogsSQS queues when new objects are created.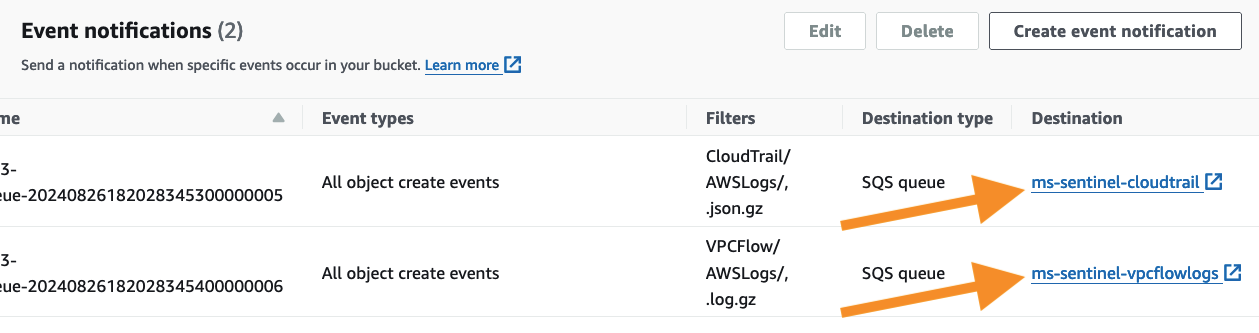
Sentinel AWS SQS Queues
Inspect either SQS queue to see how the Microsoft Sentinel IAM role is granted permissions to read messages from the queue.
-
Browse to the AWS SQS service. You may see that messages are already available in the queue for the Microsoft Sentinel service to process.

-
Select the
ms-sentinel-cloudtrailqueue and select the Access policy tab. Observe the policy has two different policy statements:-
The AllowS3SQSSendMessage statement grants the
aviata-audit-logsaudit logs bucket permission to send notifications to the queue. -
The AllowSentinelSQSGetMessage statement grants the
OIDC_MicrosoftSentinelRoleIAM role permission to process (receive / delete) messages from the queue as they are ingested into the Sentinel service.
SQS Queue Access Policy
{ "Version": "2012-10-17", "Statement": [ { "Sid": "AllowS3SQSSendMessage", "Effect": "Allow", "Principal": { "Service": "s3.amazonaws.com" }, "Action": "sqs:SendMessage", "Resource": "arn:aws:sqs:us-east-2:123456789012:ms-sentinel-cloudtrail", "Condition": { "ArnLike": { "aws:SourceArn": "arn:aws:s3:::aviata-audit-logs-{randomid}*" } } }, { "Sid": "AllowSentinelSQSGetMessage", "Effect": "Allow", "Principal": { "AWS": "arn:aws:iam::123456789012:role/OIDC_MicrosoftSentinelRole" }, "Action": [ "sqs:ReceiveMessage", "sqs:GetQueueUrl", "sqs:DeleteMessage", "sqs:ChangeMessageVisibility" ], "Resource": "arn:aws:sqs:us-east-2:123456789012:ms-sentinel-cloudtrail" } ] } -
Microsoft Sentinel AWS Connector
With the AWS resources configured to send security events to the Microsoft Sentinel service, you can now configure the AWS S3 Data Connector to ingest the logs.
Sentinel Terraform Outputs
Before you can configure the AWS S3 Data Connector, you need to retrieve the Amazon Resource Name (ARN) for the Aviata audit logs S3 bucket and SQS queue URLs. These values are available from OpenVSCode server's embedded Terminal.
Run the following command to find the Amazon Resource Name (ARN) values that you will need to configure the Microsoft Sentinel AWS S3 Data Connector
cd ~/code/ace135/src/infrastructure
terraform output
Expected Output
ms_sentinel_cloudtrail_sqs_queue_url = "https://sqs.us-east-2.amazonaws.com/12346789012/ms-sentinel-cloudtrail"
ms_sentinel_role_arn = "arn:aws:iam::12346789012:role/OIDC_MicrosoftSentinelRole"
ms_sentinel_vpcflowlogs_sqs_queue_url = "https://sqs.us-east-2.amazonaws.com/12346789012/ms-sentinel-vpcflowlogs"
Configure AWS S3 Data Connector
-
Navigate back to the Azure Portal and open the Microsoft Sentinel service.
-
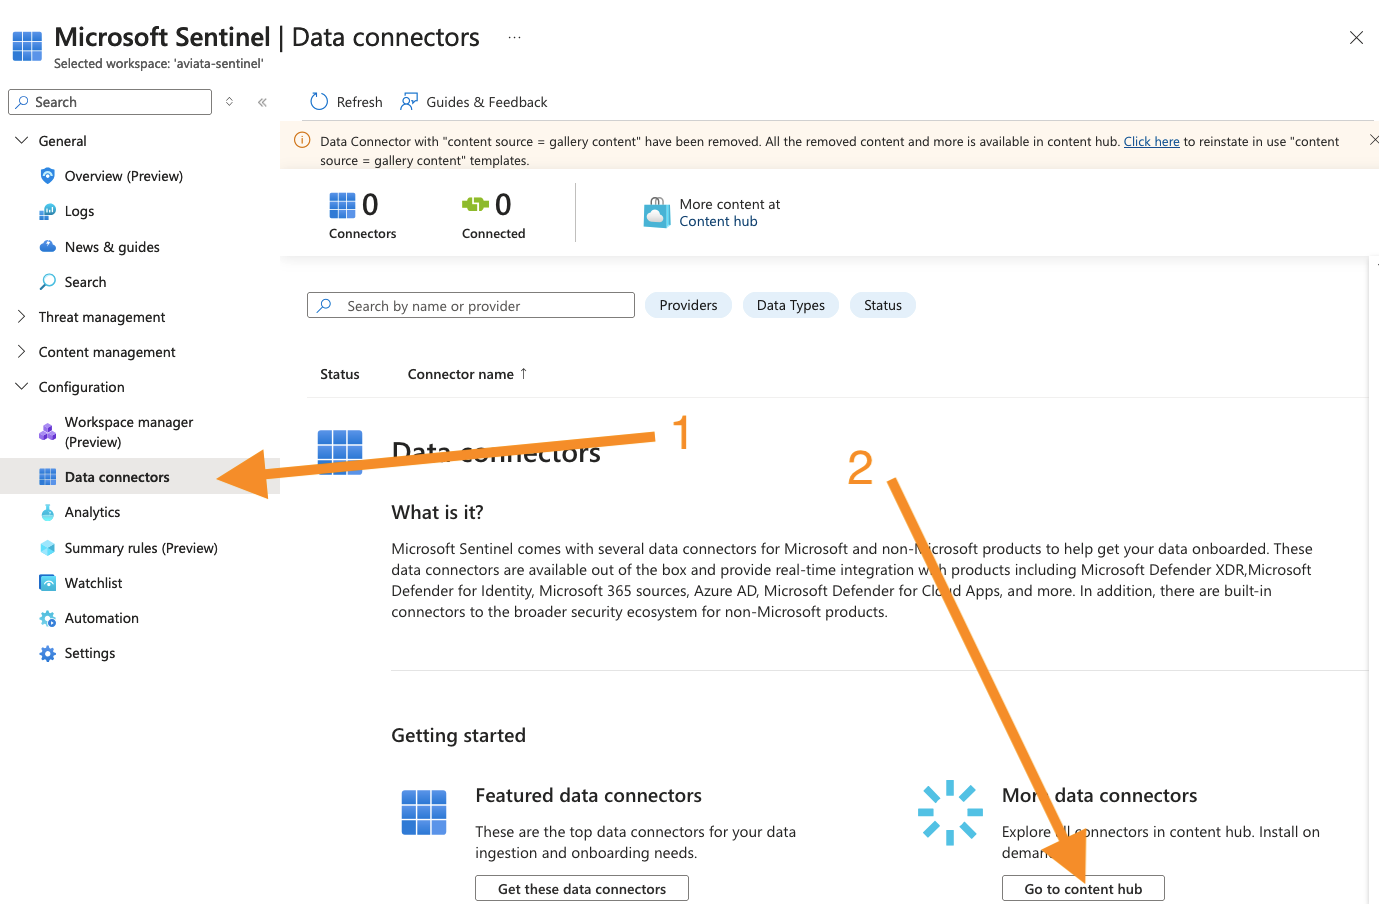
In the left navigation pane, select the Configuration > Data Connectors menu item. Then, use the Go to content hub button to find the available data connector integrations.
-
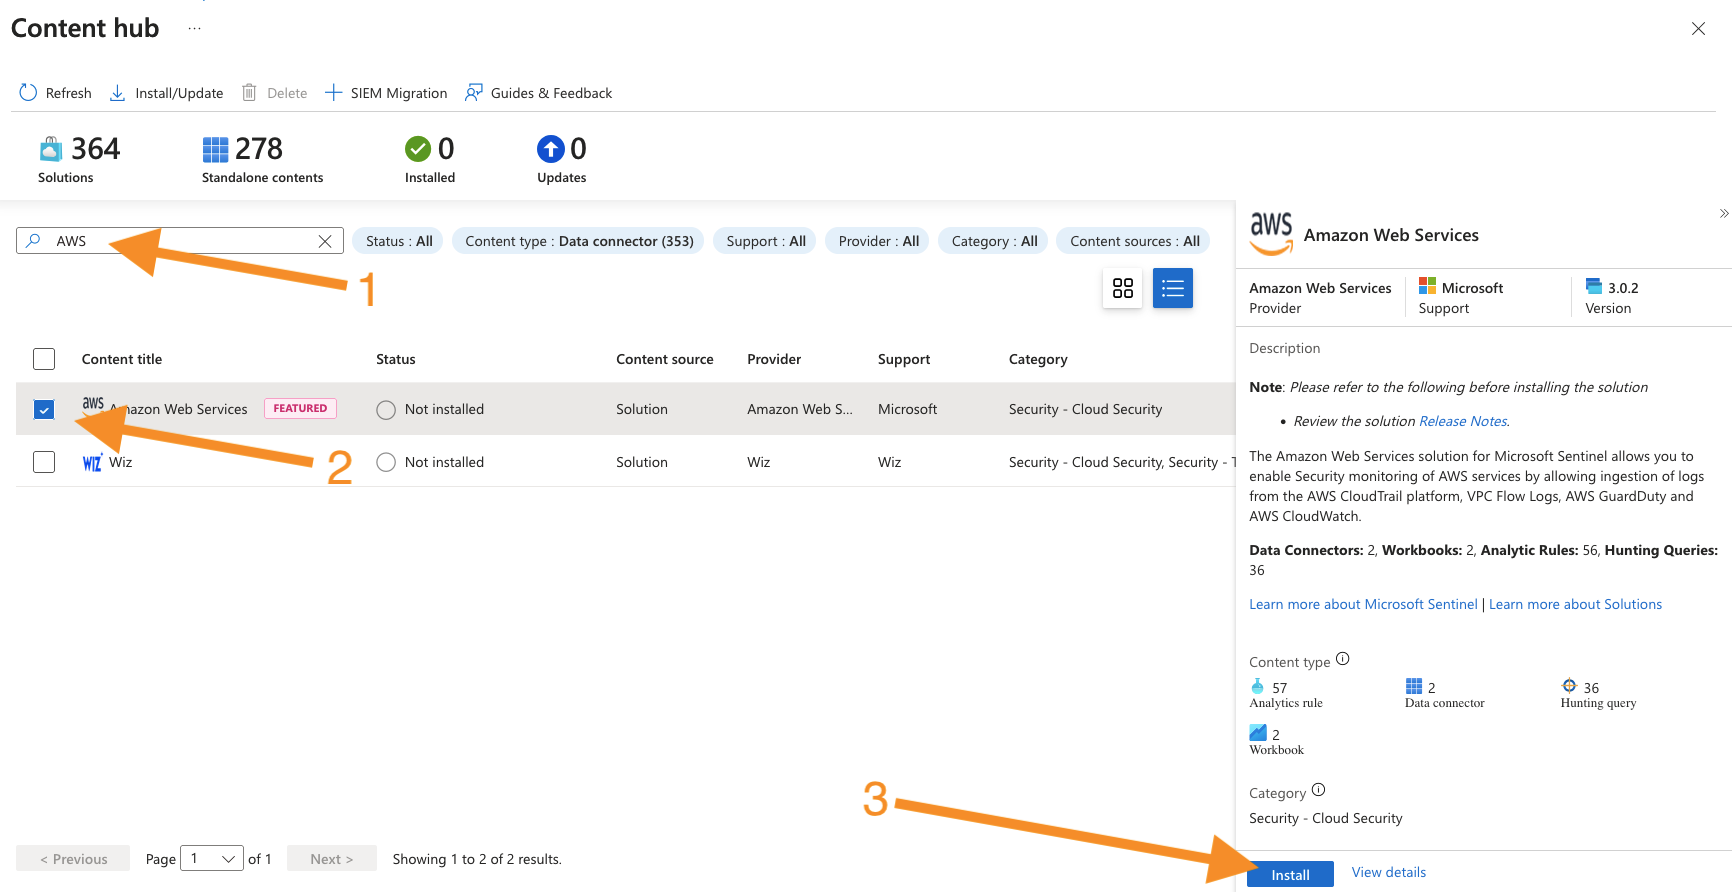
On the Sentinel Content Hub page, search for the AWS data connector, select the Amazon Web Services connector, and press the Install button.
-
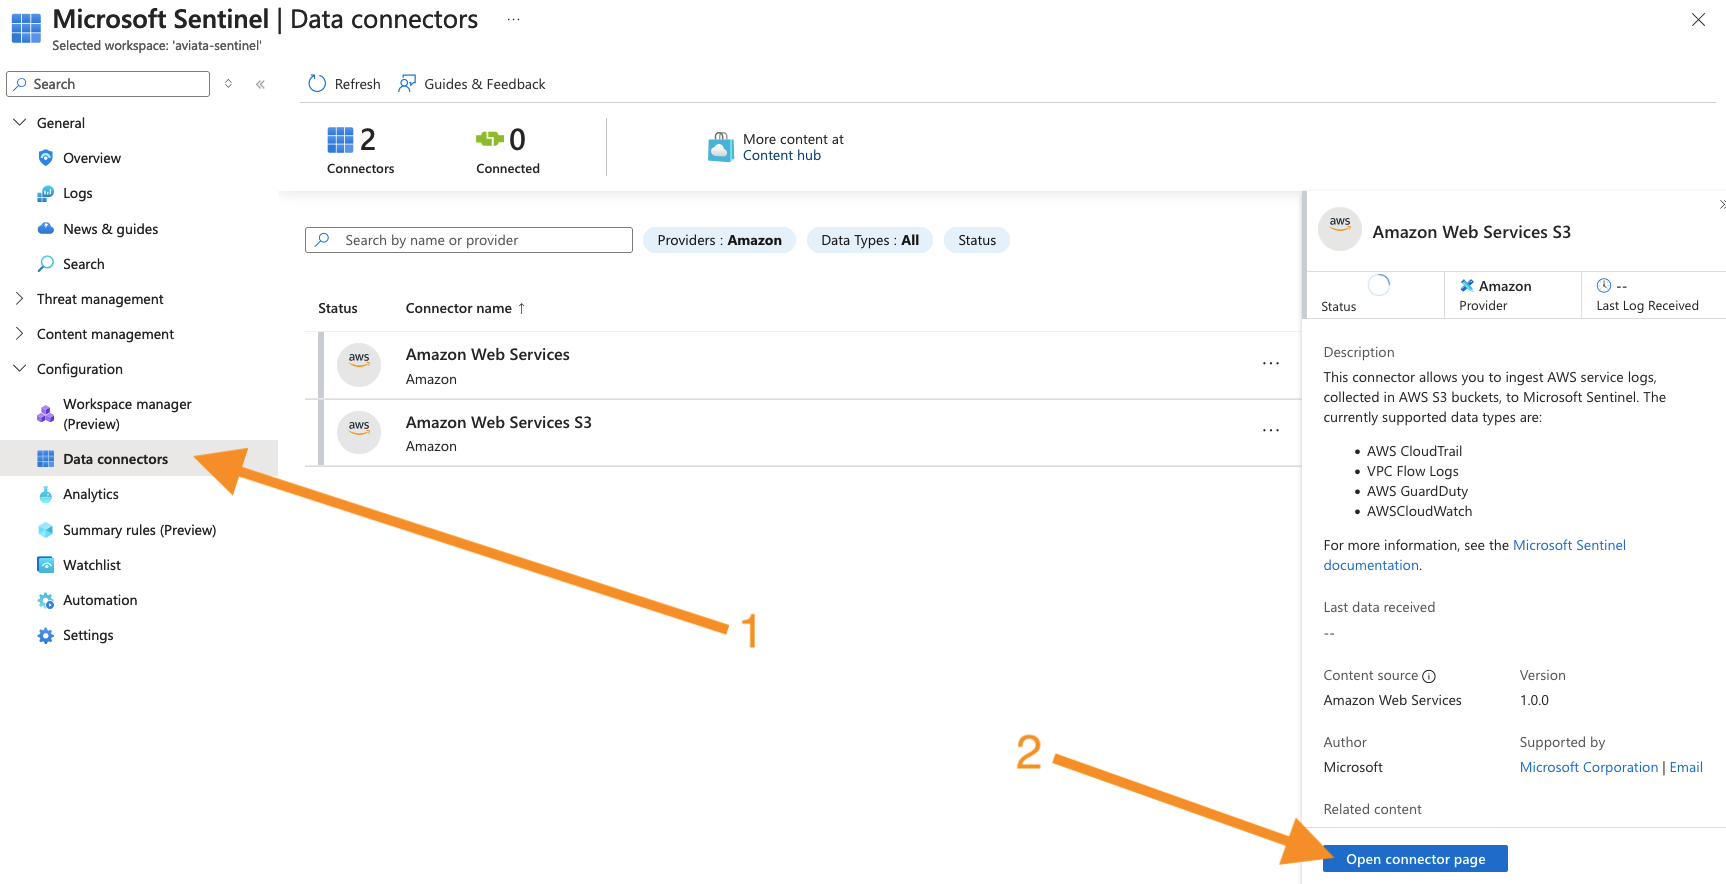
Wait a few moments for the Amazon Web Services connector to finish installing. Then, browse to the Microsoft Sentinel service again. Select the Configuration > Data Connectors menu item again. Then, select the Amazon Web Services S3 connector in the list and press the Open connector page button to configure the connection to your AWS account.
-
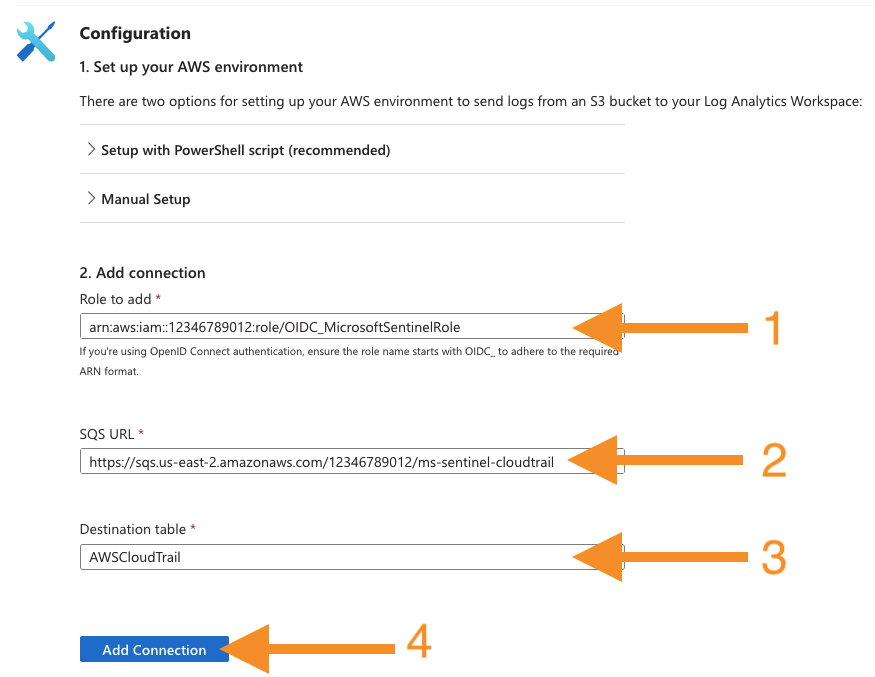
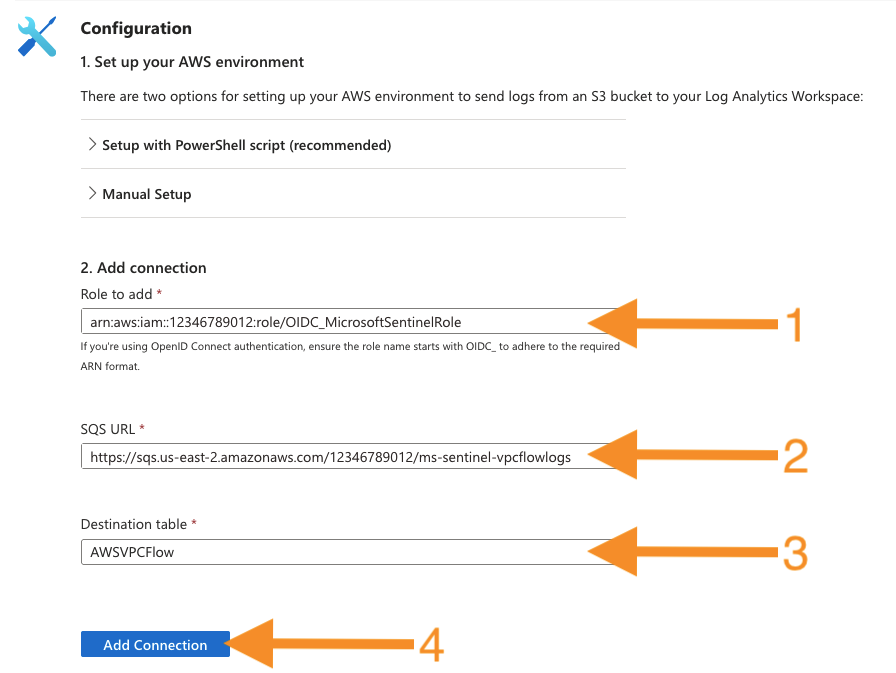
On the Amazon Web Services S3 configuration page, add the CloudTrail connection by entering the following. Then, press the Add connection button.
-
Role to add: enter the
ms_sentinel_role_arnTerraform output value. -
SQS URL: enter the
ms_sentinel_cloudtrail_sqs_queue_urlTerraform output value. -
Destination table: AWSCloudTrail
-
-
On the Amazon Web Services S3 configuration page, add the AWSVPCFlow connection by entering the following. Then, press the Add connection button.
-
Role to add: enter the
ms_sentinel_role_arnTerraform output value. -
SQS URL: enter the
ms_sentinel_vpcflowlogs_sqs_queue_urlTerraform output value. -
Destination table: AWSVPCFlow
-
-
With the Microsoft Sentinel AWS S3 Data Connectors working properly, browse to the AWS SQS service. You will see that the pending queue messages have been processed.

Sentinel Log Ingestion
The AWS S3 Data Connector can take up to 20 minutes to start ingesting data into the Sentinel log analytics workspace. When Microsoft Sentinel service starts ingesting the CloudTrail and VPC Flow Log data, you can now use the Microsoft Sentinel service to analyze the security events and identify potential security threats.
-
Browse to the Microsoft Sentinel service in the Azure Portal and select the Logs menu item. Dismiss the Getting Started and Queries hub dialog(s) if needed to show the query editor window. Set the Time range to the last 30 minutes and run the following query to search for AWS FlowLog events.
// All AWS FlowLog events
AWSVPCFlow
| project TimeGenerated, SrcAddr, SrcPort, DstAddr, DstPort, InterfaceId, LogStatus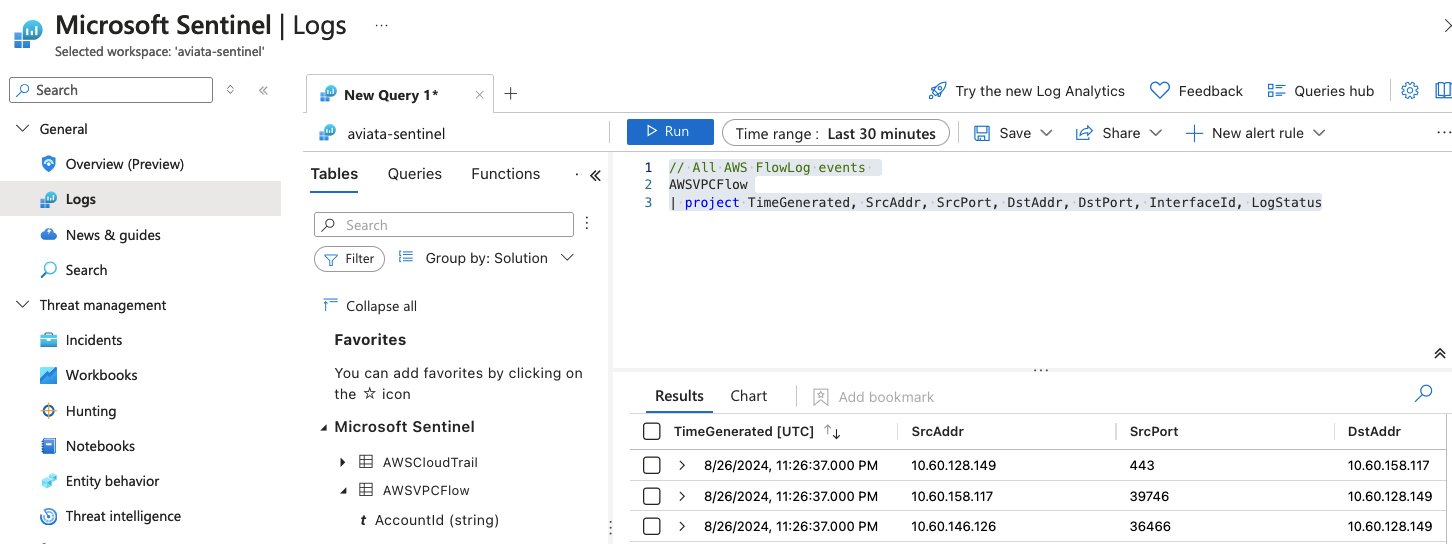
-
Browse to the Microsoft Sentinel service in the Azure Portal and select the Logs menu item. Dismiss the Queries hub dialog to show the query editor window. Set the Time range to the last 30 minutes and run the following query to search for CloudTrail events.
// All AWS CloudTrail events
// Lists all AWS cloud trail events.
AWSCloudTrail
| project TimeGenerated, EventName, EventTypeName, UserIdentityPrincipalid, UserAgent, UserIdentityUserName, SessionMfaAuthenticated, SourceIpAddress, AWSRegion, EventSource, AdditionalEventData, ResponseElements, SessionIssuerUserName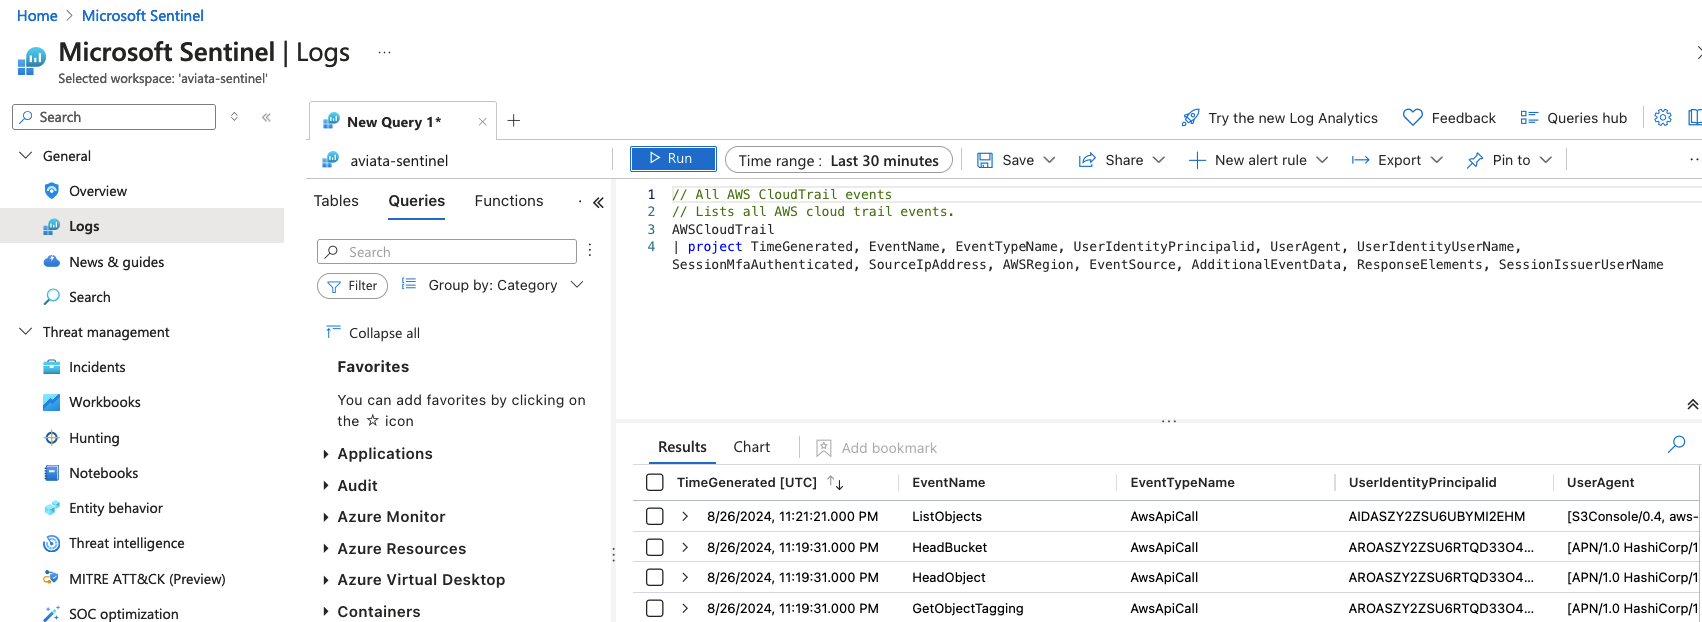
EKS Cluster Attack Detection
In Chapter 4: Attack and Detect Kubernetes, you setup a Netcat listener and deployed a reverse shell on the Aviata team's Kubernetes cluster. Start by repeating the attack. Then, we will go hunting for the VPC flow log events in Microsoft Sentinel.
Repeat the attack
Run the following commands in the OpenVSCode server's embedded Terminal.
aws eks update-kubeconfig --region us-east-2 --name aviata-eks-cluster
export PUBLIC_IP=$(curl -s http://169.254.169.254/latest/meta-data/public-ipv4)
cd ~/code/ace135/docs/chapter4/
cat revshell_template.yaml | envsubst > revshell.yaml
kubectl apply -f revshell.yaml
EKS Cluster Flow Logs Query
-
During the Kubernetes attack, you started a reverse shell between your cloud security flight simulator instance and the Aviata Kubernetes cluster. Run the following command in the OpenVSCode server's embedded Terminal.
export PUBLIC_IP=$(curl -s http://169.254.169.254/latest/meta-data/public-ipv4)
echo $PUBLIC_IP
Expected Output
YOUR_SIMULATOR_IP_ADDRESS -
Browse to the Microsoft Sentinel service in the Azure Portal and select the Logs menu item. Dismiss the Queries hub dialog to show the query editor window. Set the Time range to the last 30 minutes and run the following query to search for traffic with a destination to the C2 server (your flight simulator instance). Observe the results show the traffic leaving the Aviata VPC with a destination to the C2 server.
// All AWS FlowLog events
AWSVPCFlow
| filter DstAddr == "YOUR_SIMULATOR_IP_ADDRESS"
| project TimeGenerated, SrcAddr, SrcPort, DstAddr, DstPort, InterfaceId, LogStatus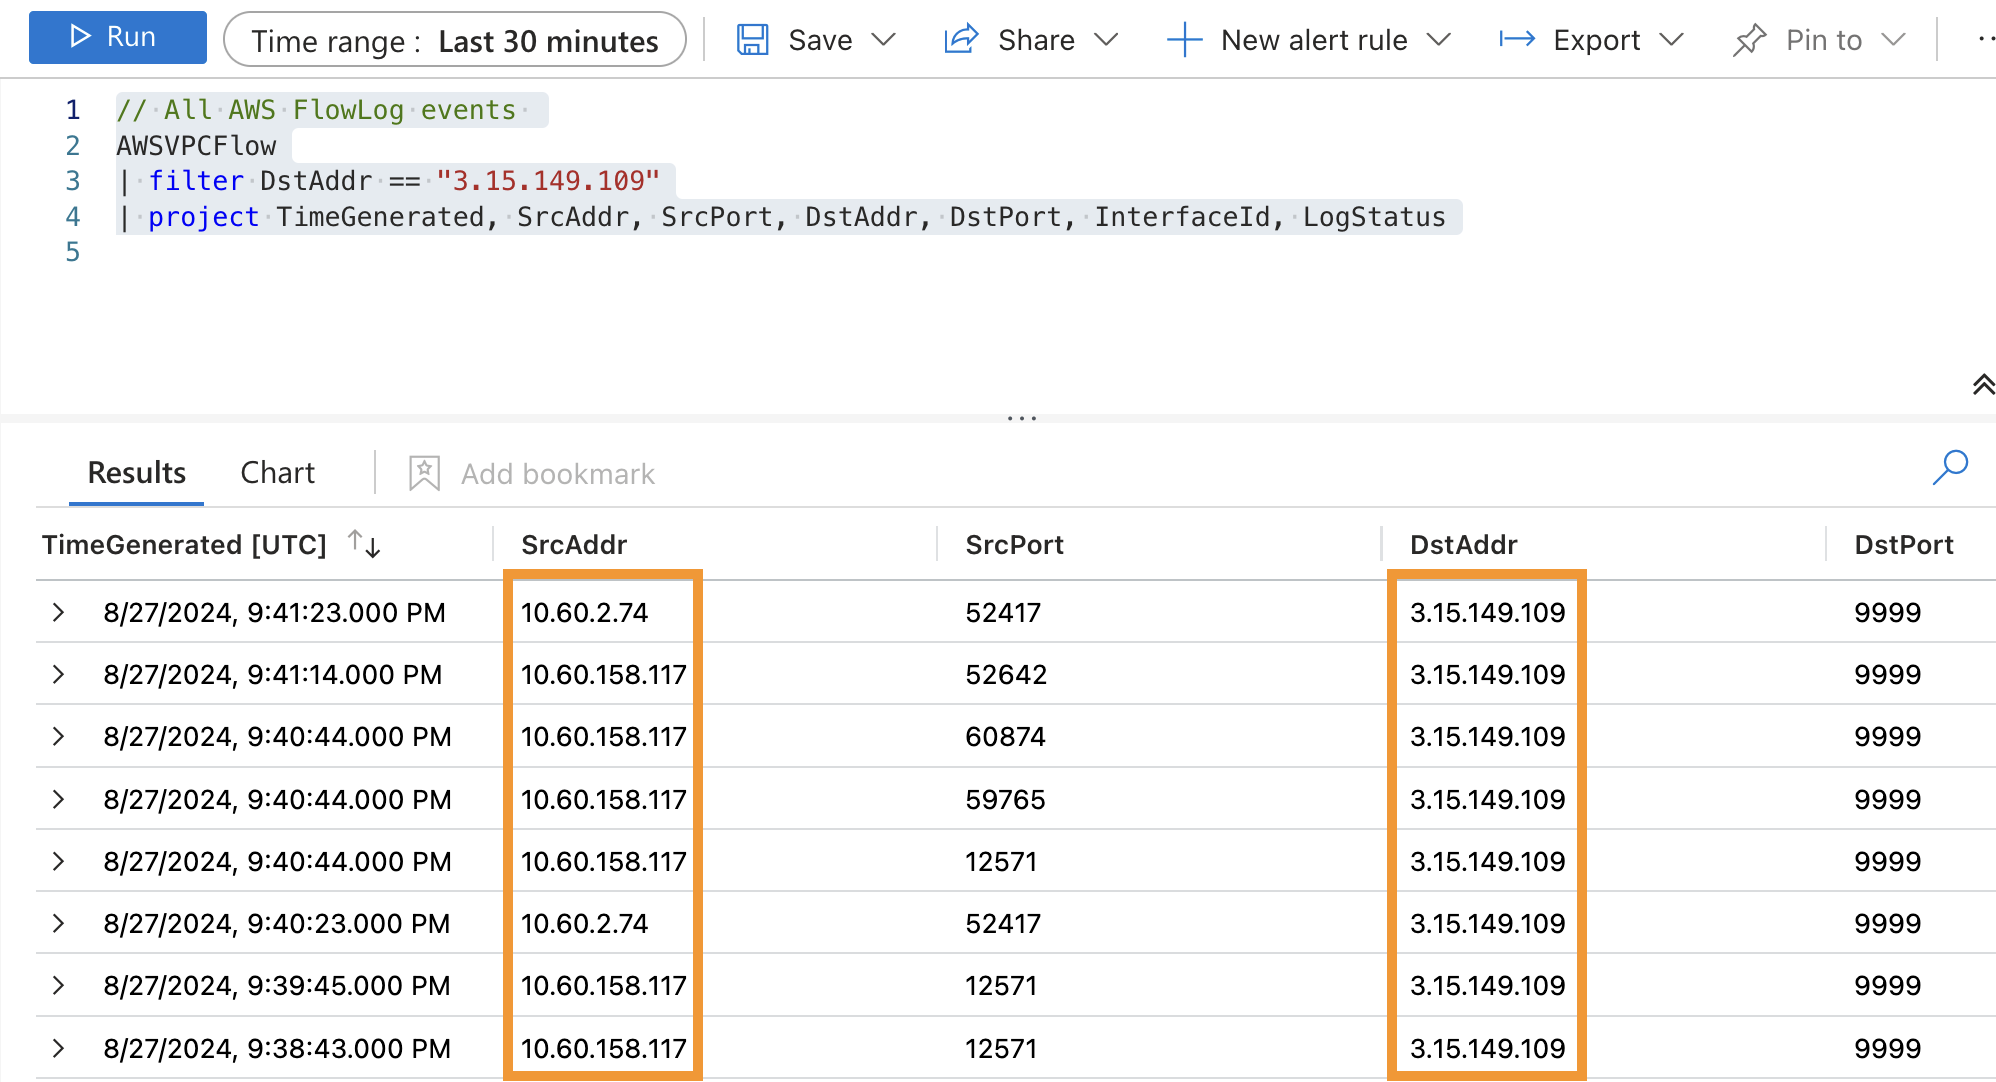
Sentinel Query Analysis
-
Next, sign into the AWS Web Console and find the AWS resources using the private IP addresses found in the query's
SrcAddrfield. -
Set the region (top right-hand corner) to
us-east-2 (Ohio). -
Navigate to the AWS EC2 service.
-
Select the Instances menu item from the left-hand menu and review the details for the
aviata-eks-nodeinstance. Does theScrAddrin the Sentinel query results show the traffic leaving the node's private network interface?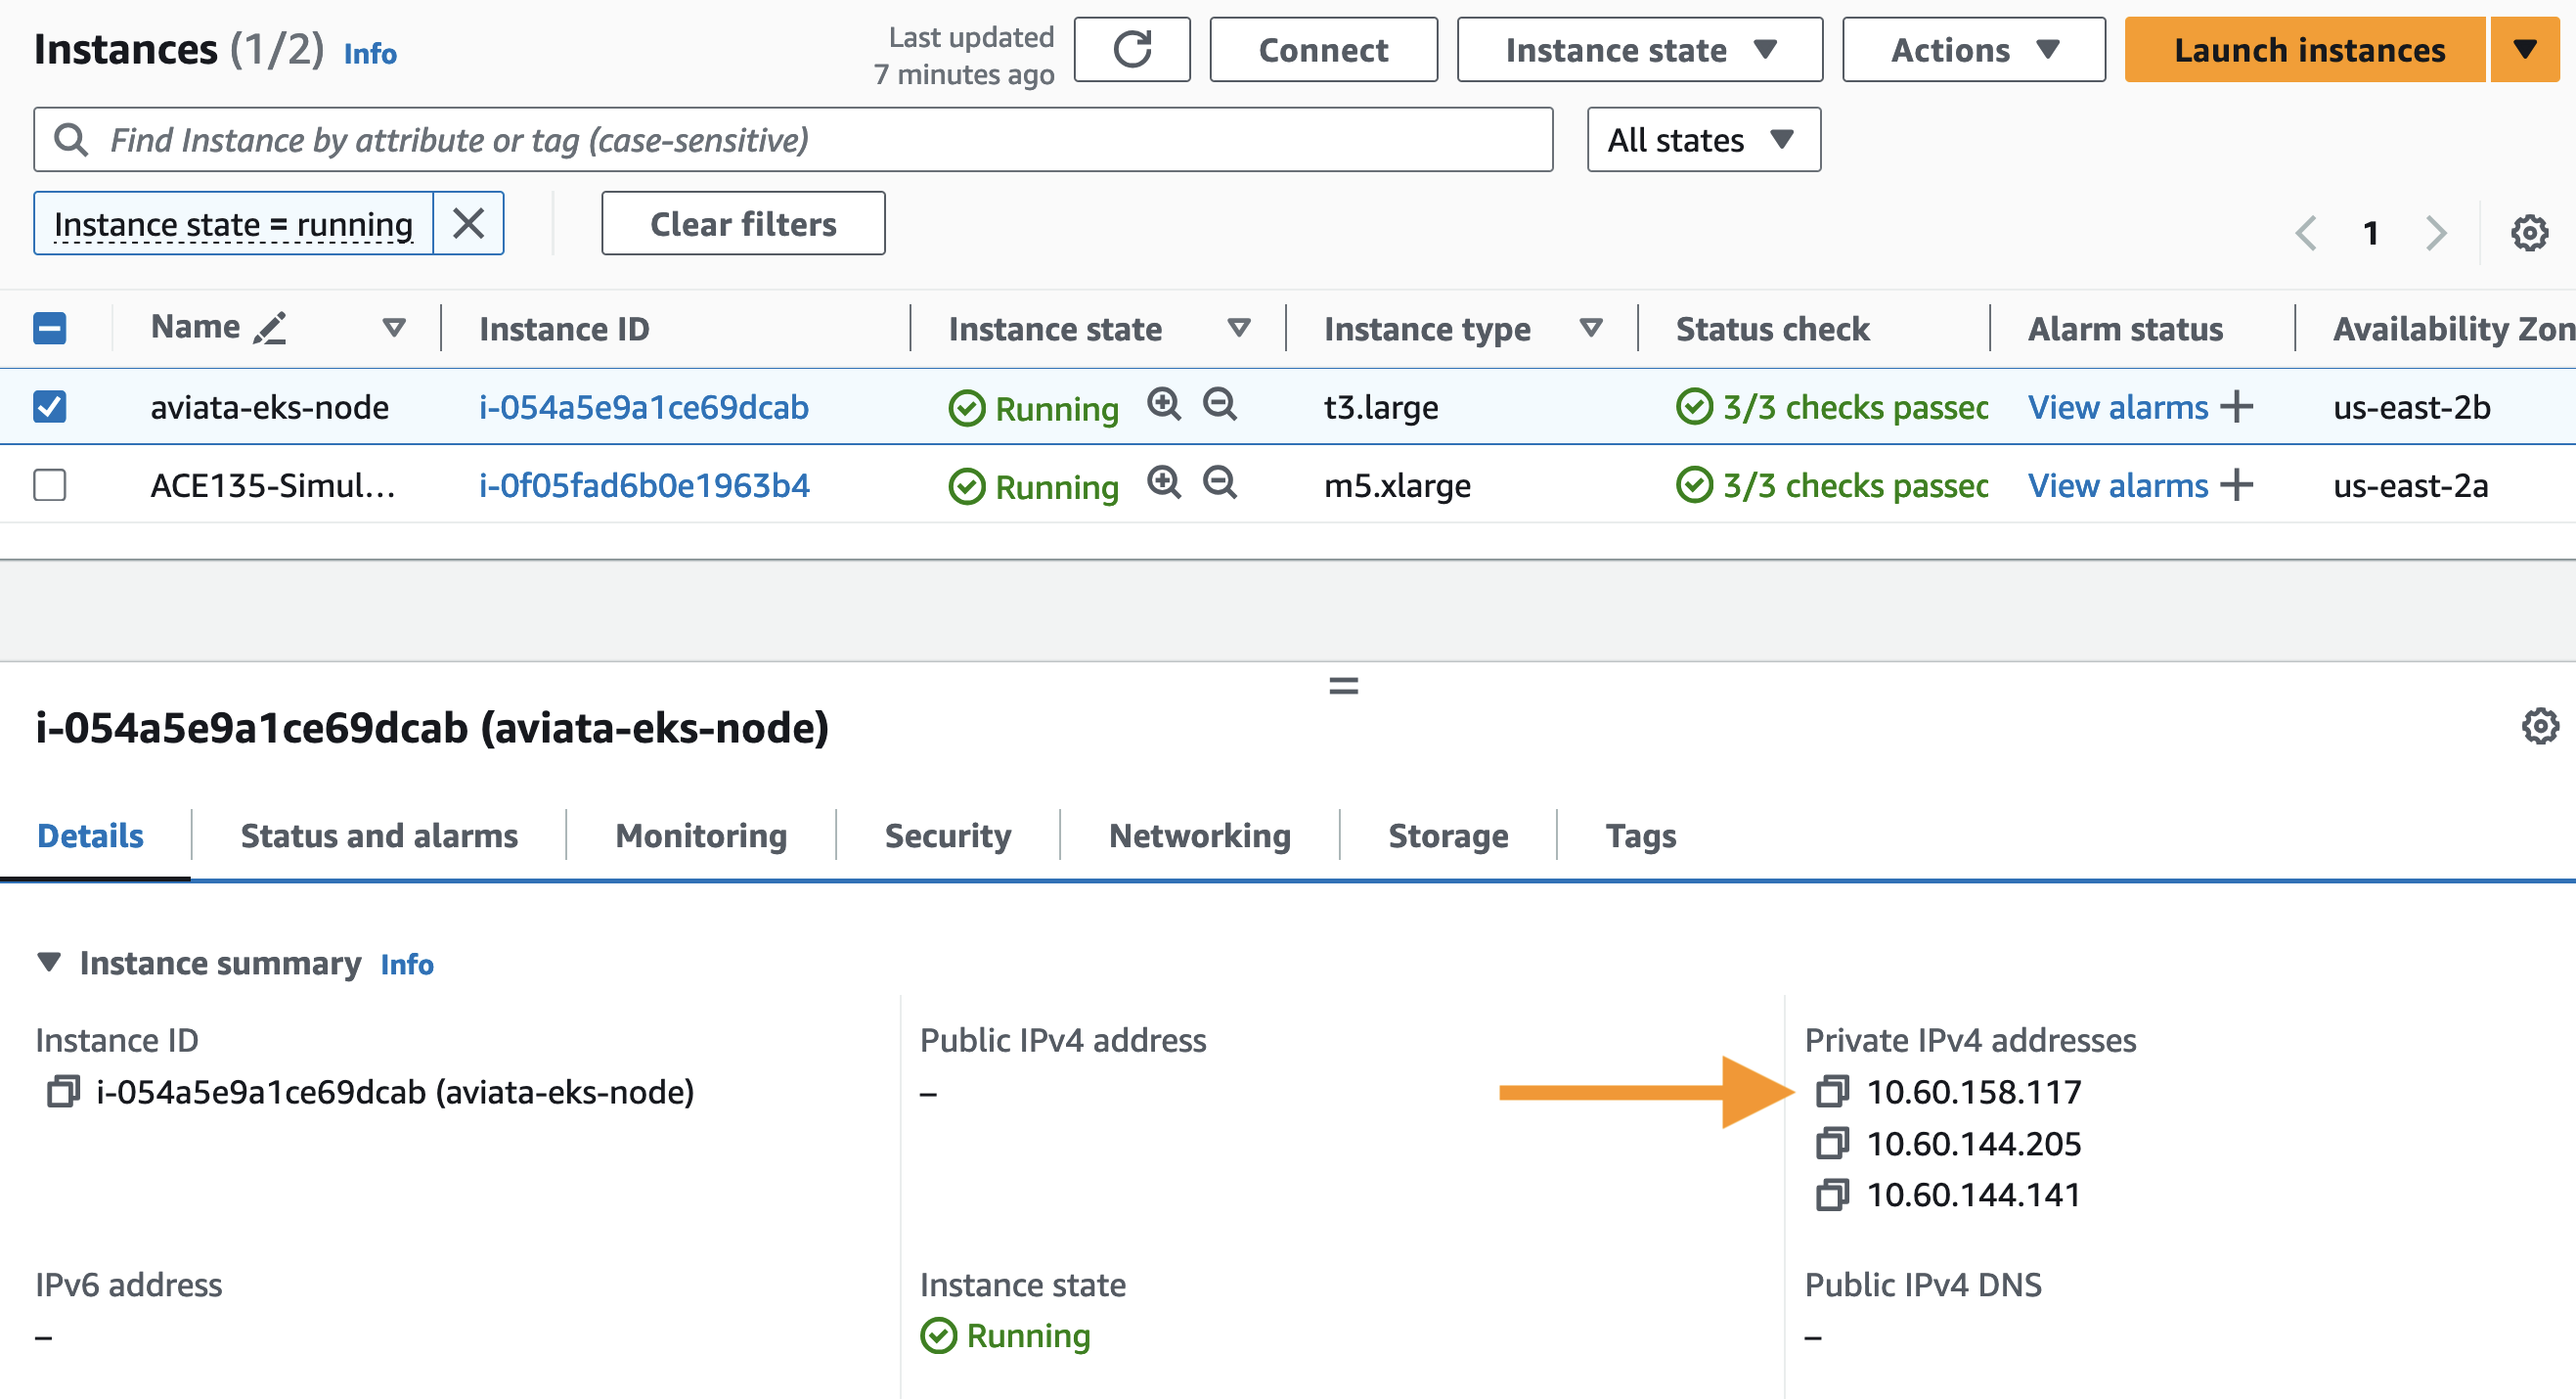
-
Navigate to the AWS VPC service and select the NAT Gateways menu item from the left-hand menu. Review the details for the
aviata-ngw-aresource. Does theSrcAddrin the Sentinel query results show the traffic leaving through the NAT Gateway?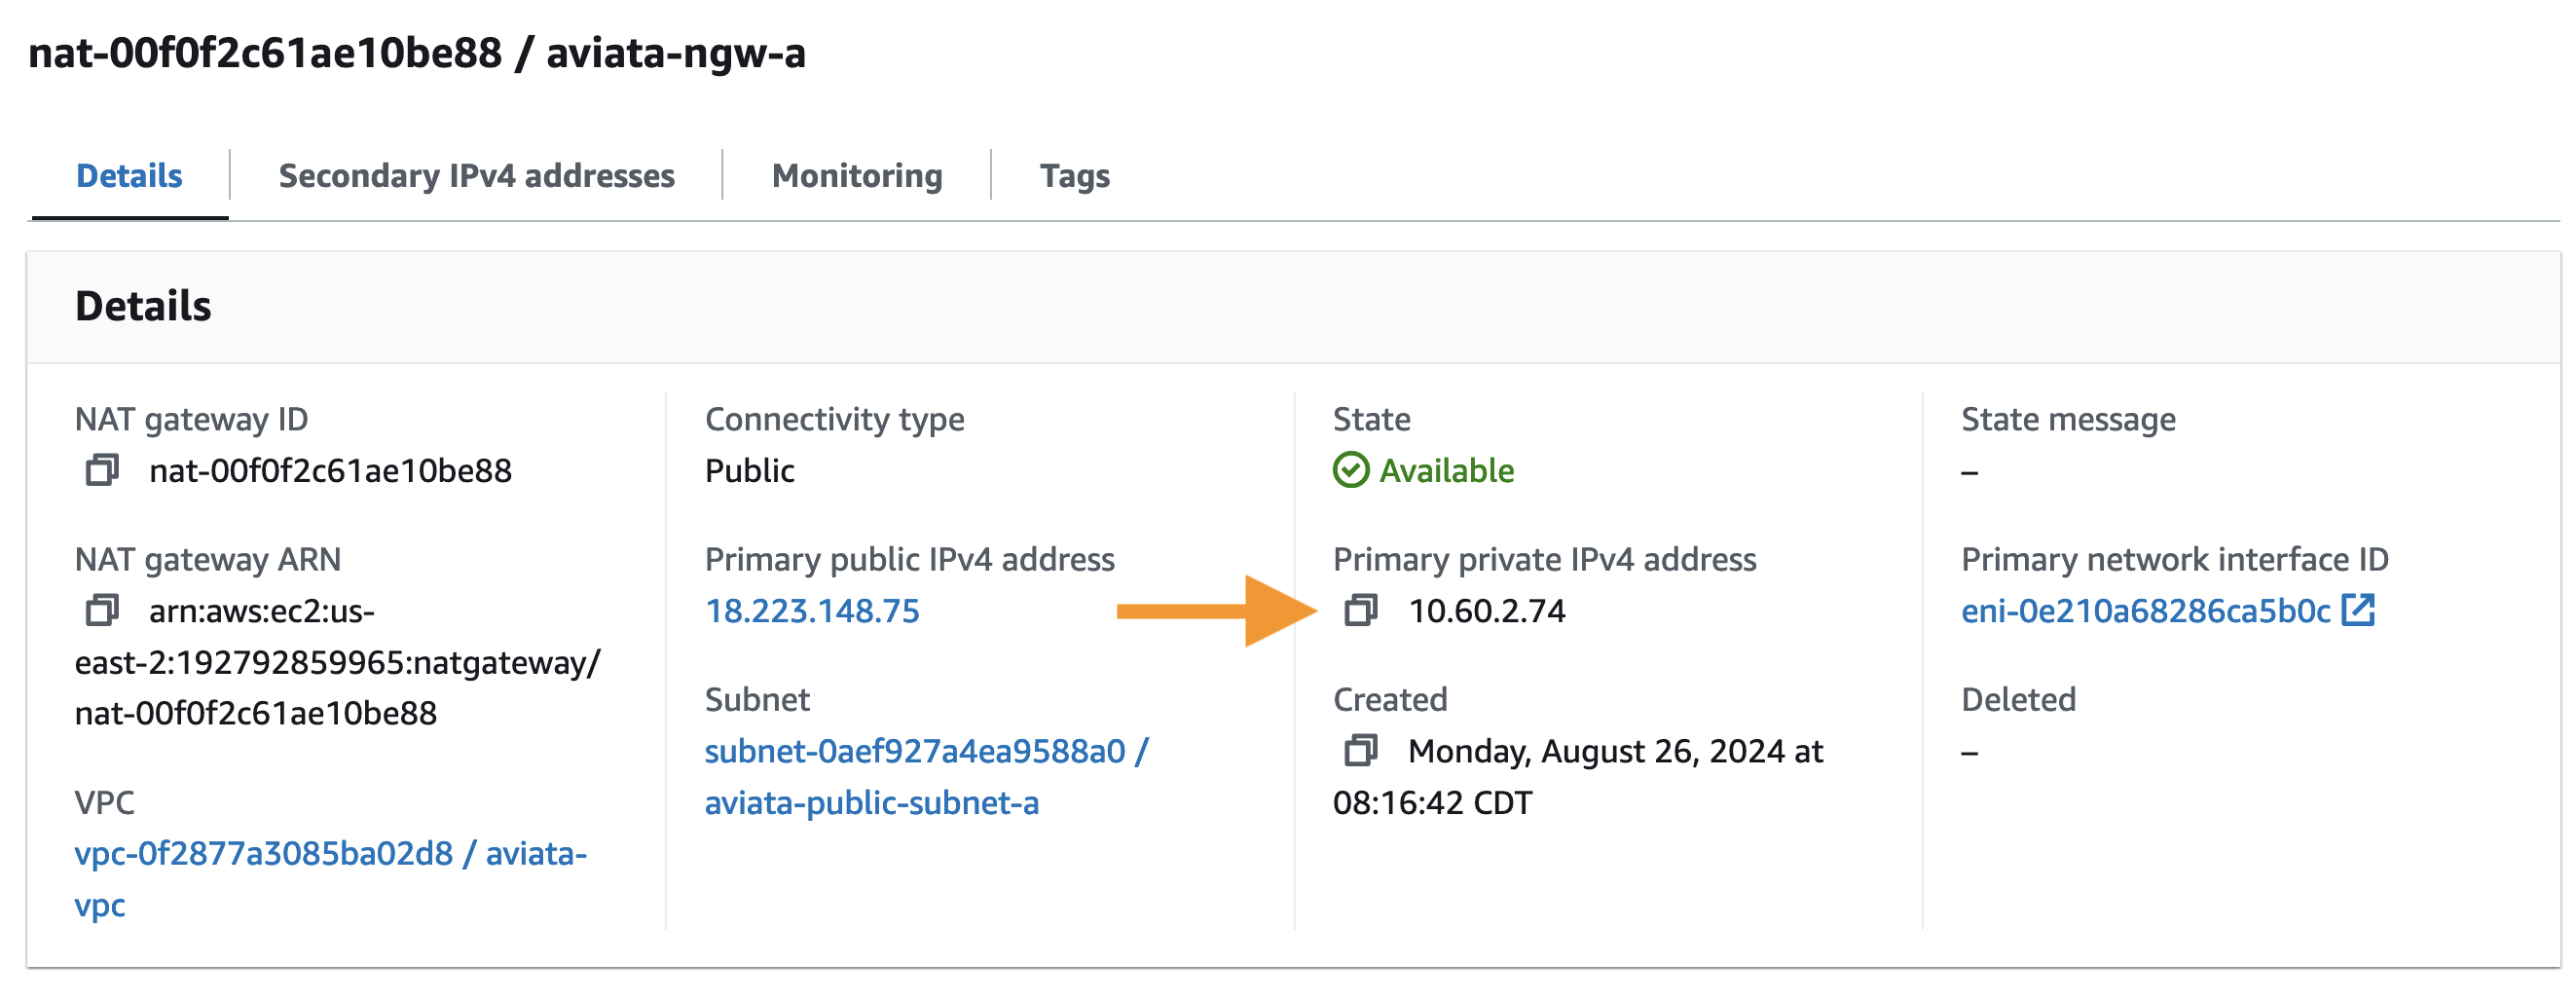
Environment Teardown
Destroy Aviata Cloud Environment
Before you leave the workshop, make sure you delete the resources you created in this chapter to avoid incurring additional costs. Run the following commands to remove the AWS resources created in this chapter.
-
Inside the OpenVSCode server, open an embedded Terminal.
-
Change into the
~/code/ace135/src/infrastructure/directory and destroy Terraform resourcescd ~/code/ace135/src/infrastructure/ export TF_VAR_region="us-east-2" terraform destroy -auto-approveIMPORTANT
Wait for your workshop environment to finish being destroyed - typically 10-15 minutes.
Sample Output
student@ace135.sans.labs ~/code/ace135/src/infrastructure (main)$ terraform destroy -auto-approve

random_id.deployment_id: Refreshing state... [id=SMCm4Q]
data.aws_iam_policy_document.eks_assume_role: Reading...
aws_cloudwatch_query_definition.unique_ports: Refreshing state... [id=5e9f4ad4-b66f-4698-822f-fb2a205724ba]
aws_cloudwatch_query_definition.k8s_image_creation: Refreshing state... [id=721a2a8e-2a9d-4145-81cd-165ace0caaaf]
data.aws_caller_identity.this: Reading...
...
aws_eks_node_group.aviata: Still destroying... [id=aviata-eks-cluster:aviata-eks-node-group, 8m10s elapsed]
aws_eks_node_group.aviata: Still destroying... [id=aviata-eks-cluster:aviata-eks-node-group, 8m20s elapsed]
aws_eks_node_group.aviata: Destruction complete after 8m20s
...
aws_cloudwatch_log_group.cluster_dataplane_logs: Destruction complete after 0s
aws_cloudwatch_log_group.cluster_host_logs: Destruction complete after 0s
aws_cloudwatch_log_group.cluster_logs: Destruction complete after 0s
aws_cloudwatch_log_group.cluster_application_logs: Destruction complete after 0s

Destroy complete! Resources: 87 destroyed.
student@ace135.sans.labs ~/code/ace135/src/infrastructure (main)$
Destroy Flight Simulator Environment
-
Log in to the AWS Console.
-
Change to the
us-east-2region. -
Open a CloudShell terminal in a new tab.
-
Run the following commands:
cd ~/ace135/
terraform destroy -auto-approve
Sample Output
...
aws_vpc.main: Destroying... [id=vpc-06e3124fc44078f9f]
aws_vpc.main: Destruction complete after 0s
random_pet.ssh_key_name: Destroying... [id=emerging-marten]
random_pet.ssh_key_name: Destruction complete after 0s

Destroy complete! Resources: 20 destroyed.
[cloudshell-user@ip-10-134-86-227 ace135]$
Destroy Microsoft Sentinel Workspace
-
Open a new browser tab and sign into the Azure Portal. Press the Cloud Shell icon next to the search box.
-
Run the following command to delete the
sans-aviata-sentinel-rgresource group.az group delete --name sans-aviata-sentinel-rg
Conclusion
Congratulations, you have completed Chapter 5: Centralizing Cross Cloud Security Events of the Aviata Cloud Solo Flight Challenge. In this chapter, you learned how to centralize security events into Microsoft Sentinel. You learned how to create a Microsoft Sentinel instance and configure the AWS S3 Data Connector. The AWS S3 Data Connector requires an AWS Identity Provider and an IAM Role to allow Sentinel to federate into your AWS account using OpenID Connect (OIDC). After calling the AssumeRoleWithWebIdentity API, Sentinel is able to check an SQS queue for log files that have not been processed and read those files from the S3 audit log bucket. This pull based logging architecture allows Sentinel to ingest logs from AWS accounts as they become available.